| Widgets |
| Snippets |
| Examples |
| FAQ |
| Tools |
| API Javadoc |
| Documentation |
| Community |
| Bugs |
| SWT Home |
| Eclipse Platform |
| Eclipse Home |

How to deploy SWT Applications using Java Web Start
Java Web Startを使用してSWTアプリケーションをデプロイする方法
SWT applications can be deployed using Java Web Start (JWS). Here are the steps to help you package and deploy your SWT application with JWS.
SWTアプリケーションはJava Web Start (JWS)を使用してデプロイすることができます。 JWSによるSWTアプリケーションのパッケージとデプロイの助けとなるステップは以下の通りです。
First, create jar archives with SWT and its libraries for each platform that you wish to run on: (see supported platforms note)
- Create a directory <yourApplication> for collecting the deployable .jar archives.
- Go to http://www.eclipse.org/swt and download the desired SWT Release for one of your target platforms. Extract this into a convenient location.
- Rename the swt.jar file in the extracted folder to a name that describes its target platform, such as swt-<platform>.jar.
- Create a .jar archive of SWT's native libraries for the target platform by going into the extracted folder and executing "
jar cvf swt-native-<platform>.jar *.<library-suffix>". <library-suffix> will be "dll" for Windows and "so" for Linux and Solaris. - Copy the jars from steps 3 and 4 into the <yourApplication> directory. Repeat steps 2 through 4 for each target platform.
初めに、実行したい各プラットフォームのSWTとそのライブラリのjarアーカイブを作成します。(サポートするプラットフォーム参照)
- デプロイ可能な.jarアーカイブを集めるためのディレクトリ<yourApplication>を作成します。
- http://www.eclipse.org/swtに行き、ターゲットのプラットフォームのSWTのリリースをダウンロードします。これを都合の良い場所に展開します。
- 展開したフォルダの中のswt.jarファイルの名前をswt-<platform>.jarのような、そのターゲットプラットフォームを表す名前に変更します。
- 展開したフォルダに行き、"
jar cvf swt-native-<platform>.jar *.<library-suffix>"を実行することでターゲットプラットフォームごとのSWTのネイティブライブラリの.jarアーカイブを作成します。 <library-suffix>はWindowsでは"dll"、LinuxとSolarisでは"so"です。 - 3と4のステップのjarを<yourApplication>ディレクトリにコピーします。2から4をターゲットプラットフォームごとに繰り返します。
Second, create a jar archive with your application:
- In Eclipse, select your application's project(s) and invoke the File->Export... menu item.
- In the Export wizard selector, select Java - Jar file and press the Next button.
- Select the files that are to be deployed, set the export destination to <yourApplication>/<yourApplication>.jar, and press Finish.
2番目に、あなたのアプリケーションのjarアーカイブを作成します。
- Eclipseでアプリケーションのプロジェクトを選択し、メニュー項目のFile->Export...を呼び出します。
- Exportウィザードセレクタにおいて、Java - Jar fileを選択し、Nextボタンを押下します。
- デプロイするファイルを選択し、エクスポート先を<yourApplication>/<yourApplication>.jarに設定し、Finishを押下します。
Third, sign all jar archives that are to be deployed:
- Go into the <yourApplication> folder, execute "
keytool -genkey -keystore keystore -alias myself", and enter all required information. - Execute "
jarsigner -keystore keystore <yourApplication>.jar myself" - Repeat step 2 for each of the swt-<platform>.jar and swt-native-<platform>.jar archives.
3番目は、デプロイされるすべてのjarアーカイブに署名します。
- <yourApplication>フォルダに行き、"
keytool -genkey -keystore keystore -alias myself"を実行し、必要なすべての情報を入力します。 - "
jarsigner -keystore keystore <yourApplication>.jar myself"を実行します。 - ステップ2をswt-<platform>.jar と swt-native-<platform>.jarごとに繰り返します。
The last step is to create a .jnlp file that will be used to launch your application through JWS (jnlp syntax guide). The example .jnlp file below demonstrates how to specify the SWT jars based on the target platform.
最後のステップはJWSでアプリケーションを起動するために使用する.jnlpファイルを作成します (jnlp syntax guide)(英語) (JNLP ファイルの構文)(日本語)。 下の.jnlpファイルの例はターゲットプラットフォームに基づいてSWT jarをどのように指定するかを実例で説明しています。
<?xml version="1.0" encoding="utf-8"?> <jnlp spec="1.0+" codebase="http://www.eclipse.org/swt/jws" href="controlexample.jnlp"> <information> <title>Control Example</title> <vendor>eclipse.org</vendor> <homepage href="http://www.eclipse.org/swt/jws/" /> <description>A demonstration of SWT Widgets</description> <description>Control Example</description> </information> <security> <all-permissions /> </security> <resources> <j2se version="1.4+" /> <jar href="controlexample.jar" /> </resources> <resources os="Windows" arch="x86"> <nativelib href="swt-native-win32-win32.jar" /> <jar href="swt-win32-win32.jar" /> </resources> <resources os="Linux" arch="ppc"> <nativelib href="swt-native-gtk-linux-ppc.jar" /> <jar href="swt-gtk-linux-ppc.jar" /> </resources> <resources os="Linux" arch="x86_64"> <nativelib href="swt-native-gtk-linux-x86_64.jar" /> <jar href="swt-gtk-linux-x86_64.jar" /> </resources> <resources os="Linux" arch="amd64"> <nativelib href="swt-native-gtk-linux-x86_64.jar" /> <jar href="swt-gtk-linux-x86_64.jar" /> </resources> <resources os="Linux"> <nativelib href="swt-native-motif-linux-x86.jar" /> <jar href="swt-motif-linux-x86.jar" /> </resources> <resources os="SunOS" arch="sparc"> <nativelib href="swt-native-gtk-solaris-sparc.jar" /> <jar href="swt-gtk-solaris-sparc.jar" /> </resources> <application-desc main-class="org.eclipse.swt.examples.controlexample.ControlExample" /> </jnlp> |
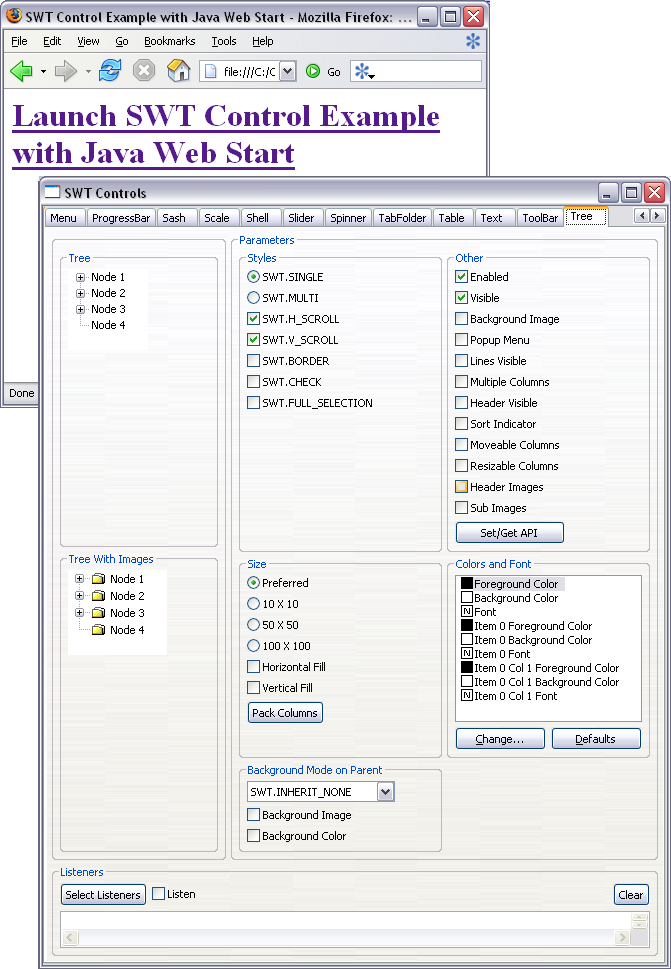
Now you can test the deployment of your application by pointing your browser at your .jnlp file (note that you must either have Java 1.5 or JWS installed on your machine). You can also create a link to the .jnlp file from an HTML page, as shown below. If all steps have been done correctly then JWS will ask if you want to trust your own unverified signature, and after answering Yes, your application will appear. (Example: http://www.eclipse.org/swt/jws/controlexample.jnlp).
.jnlpファイルをブラウザで開くことによって、あなたのアプリケーションのデプロイをテストできます(マシンにJava1.5かJWSがインストールされていなければいけないことに注意してください)。 以下のようにHTMLページから.jnlpファイルにリンクすることもできます。 すべてのステップが正しく行われたならば、JWSはあなた自身の未証明の署名を信頼するかどうか尋ね、Yesで答えるとアプリケーションが現れます。 (例: http://www.eclipse.org/swt/jws/controlexample.jnlp)
Voilà, your application is now deployable via Java Web Start!
さあ、これであなたのアプリケーションはJava Web Start経由でデプロイ可能です!
Note: As of SWT 3.2, SWT applications are not deployable using JWS on Mac OS X. See bug 63306.
注意: SWT 3.2において、SWTアプリケーションはMac OS XのJWSを使用してデプロイすることはできません。 bug 63306を参照してください。